Detect proximity - Virtual IoT Hardware
In this part of the lesson, you will add a proximity sensor to your virtual IoT device, and read distance from it.
Hardware
The virtual IoT device will use a simulated distance sensor.
In a physical IoT device you would use a sensor with a laser ranging module to detect distance.
Add the distance sensor to CounterFit
To use a virtual distance sensor, you need to add one to the CounterFit app
Task - add the distance sensor to CounterFit
Add the distance sensor to the CounterFit app.
-
Open the
fruit-quality-detectorcode in VS Code, and make sure the virtual environment is activated. -
Install an additional Pip package to install a CounterFit shim that can talk to distance sensors by simulating the rpi-vl53l0x Pip package, a Python package that interacts with a VL53L0X time-of-flight distance sensor. Make sure you are installing this from a terminal with the virtual environment activated.
pip install counterfit-shims-rpi-vl53l0x -
Make sure the CounterFit web app is running
-
Create a distance sensor:
-
In the Create sensor box in the Sensors pane, drop down the Sensor type box and select Distance.
-
Leave the Units as
Millimeter -
This sensor is an I2C sensor, so set the address to
0x29. If you used a physical VL53L0X sensor it would be hardcoded to this address. -
Select the Add button to create the distance sensor
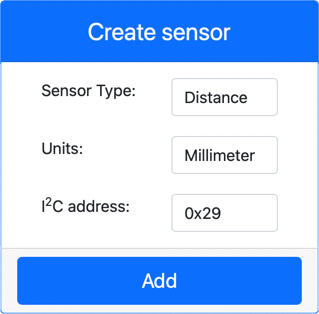
The distance sensor will be created and appear in the sensors list.
-
Program the distance sensor
The virtual IoT device can now be programmed to use the simulated distance sensor.
Task - program the time of flight sensor
-
Create a new file in the
fruit-quality-detectorproject calleddistance-sensor.py.💁 An easy way to simulate multiple IoT devices is to do each in a different Python file, then run them at the same time.
-
Start a connection to CounterFit with the following code:
from counterfit_connection import CounterFitConnection
CounterFitConnection.init('127.0.0.1', 5000) -
Add the following code below this:
import time

from counterfit_shims_rpi_vl53l0x.vl53l0x import VL53L0X
This imports the sensor library shim for the VL53L0X time of flight sensor.
-
Below this, add the following code to access the sensor:
distance_sensor = VL53L0X()
distance_sensor.begin()
This code declares a distance sensor, then starts the sensor.
-
Finally, add an infinite loop to read distances:
while True:
    distance_sensor.wait_ready()
    print(f'Distance = {distance_sensor.get_distance()} mm')
    time.sleep(1)
This code waits for a value to be ready to read from the sensor, then prints it to the console.
-
Run this code.
💁 Don't forget this file is called
distance-sensor.py! Make sure to run this via Python, notapp.py. -
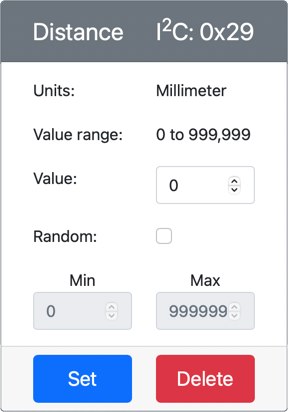
You will see distance measurements appear in the console. Change the value in CounterFit to see this value change, or use random values.
(.venv) ➜  fruit-quality-detector python distance-sensor.py
Distance = 37 mm
Distance = 42 mm
Distance = 29 mm
💁 You can find this code in the code-proximity/virtual-iot-device folder.
😀 Your proximity sensor program was a success!