Measure soil moisture - Virtual IoT Hardware
In this part of the lesson, you will add a capacitive soil moisture sensor to your virtual IoT device, and read values from it.
Virtual Hardware
The virtual IoT device will use a simulated Grove capacitive soil moisture sensor. This keeps this lab the same as using a Raspberry Pi with a physical Grove capacitive soil moisture sensor.
In a physical IoT device, the soil moisture sensor would be a capacitive sensor that measures soil moisture by detecting the capacitance of the soil, a property than changes as the soil moisture changes. As the soil moisture increases, the voltage decreases.
This is an analog sensor, so uses a simulated 10-bit ADC to report a value from 1-1,023.
Add the soil moisture sensor to CounterFit
To use a virtual soil moisture sensor, you need to add it to the CounterFit app
Task - Add the soil moisture sensor to CounterFit
Add the soil moisture sensor to the CounterFit app.
-
Create a new Python app on your computer in a folder called
soil-moisture-sensorwith a single file calledapp.pyand a Python virtual environment, and add the CounterFit pip packages.⚠️ You can refer to the instructions for creating and setting up a CounterFit Python project in lesson 1 if needed.
-
Make sure the CounterFit web app is running
-
Create a soil moisture sensor:
-
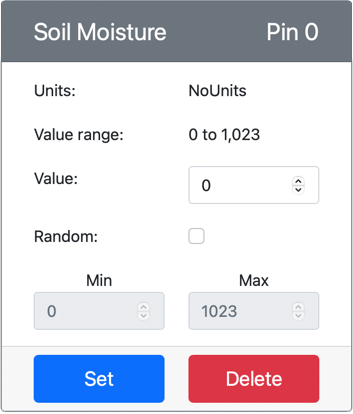
In the Create sensor box in the Sensors pane, drop down the Sensor type box and select Soil Moisture.
-
Leave the Units set to NoUnits
-
Ensure the Pin is set to 0
-
Select the Add button to create the Soil Moisture sensor on Pin 0

The soil moisture sensor will be created and appear in the sensors list.
-
Program the soil moisture sensor app
The soil moisture sensor app can now be programmed using the CounterFit sensors.
Task - program the soil moisture sensor app
Program the soil moisture sensor app.
-
Make sure the
soil-moisture-sensorapp is open in VS Code -
Open the
app.pyfile -
Add the following code to the top of
app.pyto connect the app to CounterFit:from counterfit_connection import CounterFitConnection
CounterFitConnection.init('127.0.0.1', 5000) -
Add the following code to the
app.pyfile to import some required libraries:import time
from counterfit_shims_grove.adc import ADCThe
import timestatement imports thetimemodule that will be used later in this assignment.The
from counterfit_shims_grove.adc import ADCstatement imports theADCclass to interact with a virtual analog to digital converter that can connect to a CounterFit sensor. -
Add the following code below this to create an instance of the
ADCclass:adc = ADC() -
Add an infinite loop that reads from this ADC on pin 0 and write the result to the console. This loop can then sleep for 10 seconds between reads.
while True:
    soil_moisture = adc.read(0)
    print("Soil moisture:", soil_moisture)

time.sleep(10) -
From the CounterFit app, change the value of the soil moisture sensor that will be read by the app. You can do this in one of two ways:
-
Enter a number in the Value box for the soil moisture sensor, then select the Set button. The number you enter will be the value returned by the sensor.
-
Check the Random checkbox, and enter a Min and Max value, then select the Set button. Every time the sensor reads a value, it will read a random number between Min and Max.
-
-
Run the Python app. You will see the soil moisture measurements written to the console. Change the Value or the Random settings to see the value change.
(.venv) ➜ soil-moisture-sensor $ python app.py
Soil moisture: 615
Soil moisture: 612
Soil moisture: 498
Soil moisture: 493
Soil moisture: 490
Soil Moisture: 388
💁 You can find this code in the code/virtual-device folder.
😀 Your soil moisture sensor program was a success!